Help, FAQs & User Guide
How do you share a post? What's the deal with followers becoming friends? Did you know you can save other users posts? And what are those little icons at the top of a post?
shcked offers up a sweet variety of features to express yourself and reach the people you want to. We aim to answer questions big and small with regards to navigating these features and getting the most out of your experience.
Creating content
Adding hashtags to posts
We're all familiar with hashtags, but just to recap: hashtags are typically short, precise pieces of text attached to your post and designed to provide a reference to the content of your post.
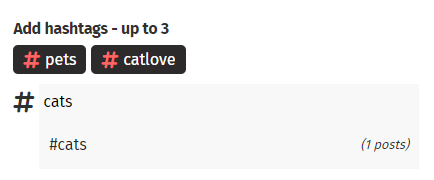
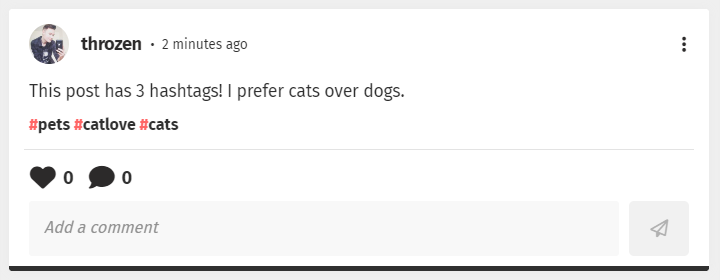
You can add up to 3 hashtags to your post to help broaden the reach of your post. These hashtags could then be discovered on each of the respective hashtags' feed page (using the example above: /hashtag/cats) as well as the Explore page.
We're all familiar with hashtags, but just to recap: hashtags are typically short, precise pieces of text attached to your post and designed to provide a reference to the content of your post.


You can add up to 3 hashtags to your post to help broaden the reach of your post. These hashtags could then be discovered on each of the respective hashtags' feed page (using the example above: /hashtag/cats) as well as the Explore page.
Followed #hashtags appearing in your feed
Posts that have been attached with a hashtag that you have chosen to follow may appear in your feed, as part of our algorithm to bring you content we believe you'd like to see:
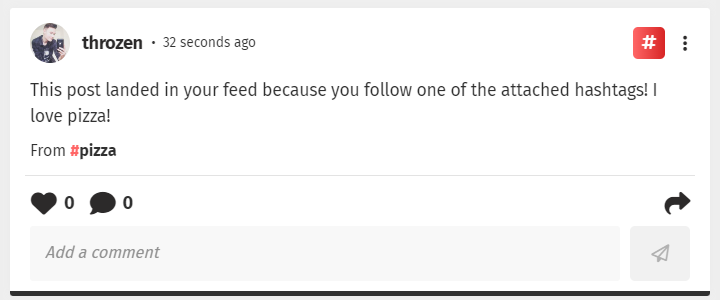
The post above is attached with the hashtag #pizza and I have chosen to follow #pizza. These posts are tagged with: 'From [#hashtag]'. It will also carry the trademark red icon picturing a hashtag symbol in the top right-hand side of the post.
Posts that have been attached with a hashtag that you have chosen to follow may appear in your feed, as part of our algorithm to bring you content we believe you'd like to see:

The post above is attached with the hashtag #pizza and I have chosen to follow #pizza. These posts are tagged with: 'From [#hashtag]'. It will also carry the trademark red icon picturing a hashtag symbol in the top right-hand side of the post.
Sharing a post to your feed
Sharing a post is pretty simple - simply click the curving arrow on the right-hand side of a post to instantly share it to your feed
You can also click the 'Share' option in the post's right-hand side popout menu.
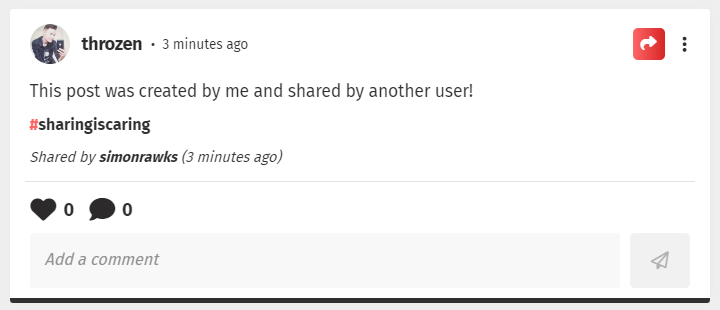
The shared post will be tagged with: 'Shared by [your username]', with the time you shared it. It will also carry the trademark red icon picturing the curving arrow in the top right-hand side of the post.
Sharing a post is pretty simple - simply click the curving arrow on the right-hand side of a post to instantly share it to your feed

You can also click the 'Share' option in the post's right-hand side popout menu.

The shared post will be tagged with: 'Shared by [your username]', with the time you shared it. It will also carry the trademark red icon picturing the curving arrow in the top right-hand side of the post.
What Friends are, and how they differ from Followers
(tl;dr: Friends are simply Followers that can see private, exclusive posts, set using the 'Post to Friends only' checkbox in the post modal popup. Upgrade a Follower to a Friend via that user's profile.)
shcked has a unique two-tier system - Followers and Friends. Friends is an upgrade of Followers that grants the recipient special privileges and allows for a deeper level of privacy with posts of your choice.
How to Follow and Friend another user
By default, when clicking the 'Follow' button on another user's profile you will become a standard Follower. As a Follower, you will be able to view the user's typical posts as expected. Alongside this button on their profile, however, is another button to add the user as a Friend, featuring a heart icon within:

When you and another user Follow each other, you will unlock the ability to extend that relationship by clicking the Friends button. (You cannot add a user as a Friend until you are both Following one-another.)
What are the benefits of being a user's Friend?
When creating a post, you can check a checkbox that will set it to be 'Friends only':
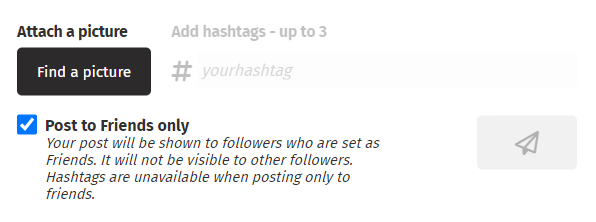
This post, when published, will only be visible to your Friends. A standard Follower will not be able to see it, nor will users who are not logged in.
The purpose of this function is to allow the publishing of posts that are considered more personal or sensitive only to Friends amongst your wider audience of Followers, ensuring privacy when desired.
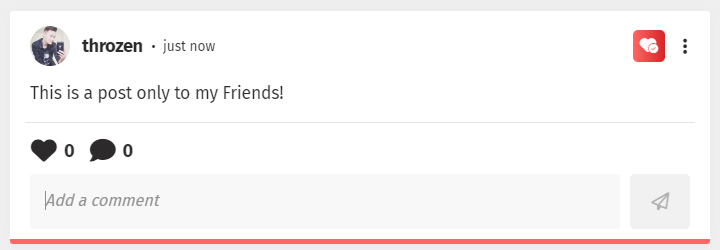
These posts will be identifiable with a red coloured border underneath the post, instead of the typical black border. They will also carry the trademark red icon picturing a heart symbol in the top right-hand side of the post.
Posts set to publish to Friends only cannot be attached with hashtags, as they are essentially private posts not intended for discovery. These posts can also be edited to uncheck the 'Friends only' checkbox at any time, which would allow all of your Followers to see it.
How can the Friends upgrade be removed?
The Friends upgrade given to another user can be removed in several ways:
- When choosing to Unfriend the user, by clicking the Friend 'heart' button on their profile or elsewhere on the site.
- When choosing to Unfollow the user, set as a Friend, by clicking the 'Following' button on their profile or elsewhere on the site. When you Unfollow a user, all connection is severed, including any Friends upgrade given by either user.
- When blocking the user set as a Friend.
(tl;dr: Friends are simply Followers that can see private, exclusive posts, set using the 'Post to Friends only' checkbox in the post modal popup. Upgrade a Follower to a Friend via that user's profile.)
shcked has a unique two-tier system - Followers and Friends. Friends is an upgrade of Followers that grants the recipient special privileges and allows for a deeper level of privacy with posts of your choice.
How to Follow and Friend another user
By default, when clicking the 'Follow' button on another user's profile you will become a standard Follower. As a Follower, you will be able to view the user's typical posts as expected. Alongside this button on their profile, however, is another button to add the user as a Friend, featuring a heart icon within:

When you and another user Follow each other, you will unlock the ability to extend that relationship by clicking the Friends button. (You cannot add a user as a Friend until you are both Following one-another.)
What are the benefits of being a user's Friend?
When creating a post, you can check a checkbox that will set it to be 'Friends only':

This post, when published, will only be visible to your Friends. A standard Follower will not be able to see it, nor will users who are not logged in.
The purpose of this function is to allow the publishing of posts that are considered more personal or sensitive only to Friends amongst your wider audience of Followers, ensuring privacy when desired.

These posts will be identifiable with a red coloured border underneath the post, instead of the typical black border. They will also carry the trademark red icon picturing a heart symbol in the top right-hand side of the post.
Posts set to publish to Friends only cannot be attached with hashtags, as they are essentially private posts not intended for discovery. These posts can also be edited to uncheck the 'Friends only' checkbox at any time, which would allow all of your Followers to see it.
How can the Friends upgrade be removed?
The Friends upgrade given to another user can be removed in several ways:
- When choosing to Unfriend the user, by clicking the Friend 'heart' button on their profile or elsewhere on the site.
- When choosing to Unfollow the user, set as a Friend, by clicking the 'Following' button on their profile or elsewhere on the site. When you Unfollow a user, all connection is severed, including any Friends upgrade given by either user.
- When blocking the user set as a Friend.
Explaining Strikes and how to post one
Strikes, as in lightning strikes signified by the lightning bolt icon, are short, snappy text-only posts separate to feed posts that, once published, will be live for 24 hours before expiring. They allow you to create temporarily-viewable updates not intended to permanently define your feed and profile. Only one Strike can be live at any given time.
You can add a new Strike, or replace an existing Strike, by clicking on the lightning bolt icon against your profile picture:
Once clicked, it raises the Strike modal popup:
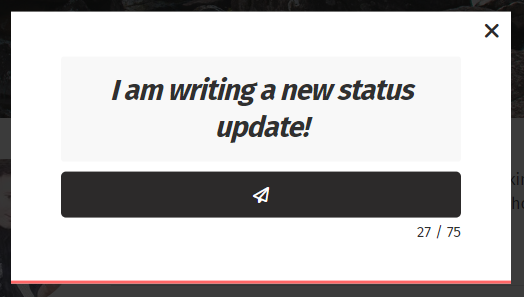
When a new Strike has been published, users can be see it by clicking on your profile picture on your Profile, in the Strike sidebar on the main Feed page (on desktop and large tablet devices only), or the Strike modal popup in the site header (on mobile and small tablet devices only).
Strikes, as in lightning strikes signified by the lightning bolt icon, are short, snappy text-only posts separate to feed posts that, once published, will be live for 24 hours before expiring. They allow you to create temporarily-viewable updates not intended to permanently define your feed and profile. Only one Strike can be live at any given time.
You can add a new Strike, or replace an existing Strike, by clicking on the lightning bolt icon against your profile picture:

Once clicked, it raises the Strike modal popup:

When a new Strike has been published, users can be see it by clicking on your profile picture on your Profile, in the Strike sidebar on the main Feed page (on desktop and large tablet devices only), or the Strike modal popup in the site header (on mobile and small tablet devices only).
Explaining Albums and how to use them
Albums are essentially akin to folders and categories that you can create to segment your posts on your profile into different spaces. You can create up to four albums. Albums look like this on a profile:
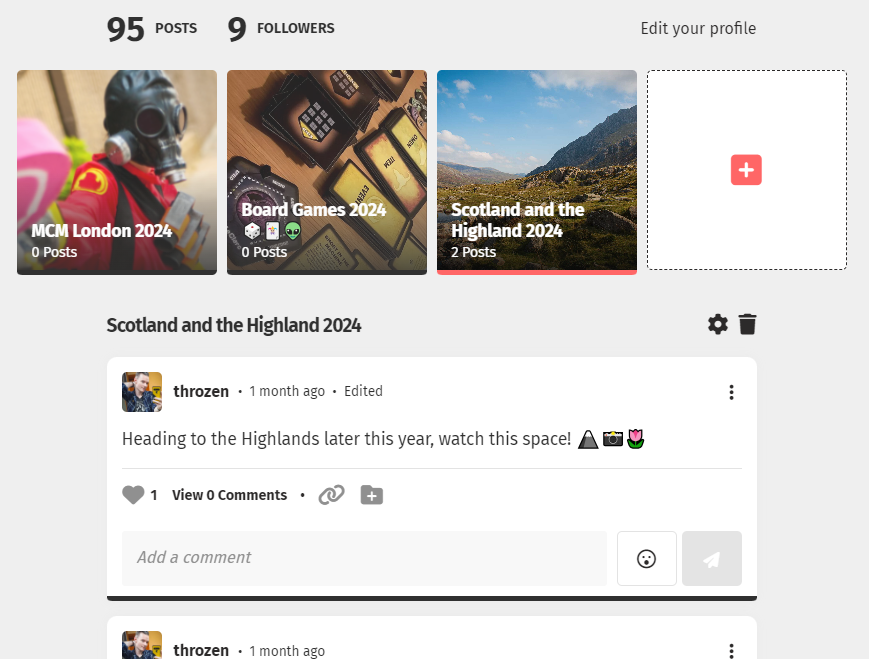
How do Albums work?
Every post you create will appear in your General feed as standard, but you can choose to add specific posts in an album. When visiting your profile or another user's profile, clicking on an album will only load posts from that album into the feed. Posts added an album can also be seen in the General feed.
It is not possible to remove posts from your General feed, as it is a representation of every post made on your account.
What are the benefits of Albums?
- Enhance your profile's presence by organising your posts, to create more focused, themed feeds.
- Choose a priority album to be shown as the default feed when first loading up your profile, allowing you to show your followers particular content as opposed to any and all posts from the General feed.
- Using our Pinning function, you can pin an album post to the top of that album's feed. Combine with the priority feature, you can put a particular post front and center when viewing your profile.
- Albums can be a permanent means of holding posts or be deleted if desired, enabling the ability to create temporary spaces for specific posts, such as events.
- Cultivate a profile truly distinct from other users.
- Customise your albums with a name and cover photo!
How to create an album
If you haven't created an album on your profile, you will see the following panel above your General feed:
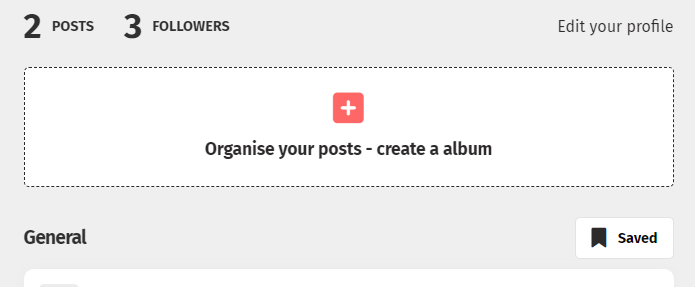
Clicking this will allow you to create your first album, including a name, a cover photo and the option to set it as your default feed when you, followers and visitors view your profile.
You can create up to four albums
Muting a user's Album
We have provided a means for muting/silencing another user's album, including their General feed. This function provides the benefit of only being shown a particular kind of content in your latest feed.
For example, let's say I enjoy posting pictures of dogs as well as posting about scientology, both of which I segment into separate albums. Some users may not want to see my posts about scientology, but they do enjoy my dog pictures, so they have the freedom to mute the album holding scientology posts, to cultivate a feed more geared to their preferences, while still being subscribed to my content.
Muting all albums and the General feed on another user's profile will essentially mute them entirely until either an album or the General feed is unmuted. This is useful if you want to take a break from another user's content without unfollowing them.
Handling your album
You can change an album's name, cover photo and priority as the default feed any time. You can also delete an album at your leisure. Deleting an album will not delete the posts held inside it - these can still be seen via your General feed.
Posts cannot be added to multiple albums.
Albums are essentially akin to folders and categories that you can create to segment your posts on your profile into different spaces. You can create up to four albums. Albums look like this on a profile:

How do Albums work?
Every post you create will appear in your General feed as standard, but you can choose to add specific posts in an album. When visiting your profile or another user's profile, clicking on an album will only load posts from that album into the feed. Posts added an album can also be seen in the General feed.
It is not possible to remove posts from your General feed, as it is a representation of every post made on your account.
What are the benefits of Albums?
- Enhance your profile's presence by organising your posts, to create more focused, themed feeds.
- Choose a priority album to be shown as the default feed when first loading up your profile, allowing you to show your followers particular content as opposed to any and all posts from the General feed.
- Using our Pinning function, you can pin an album post to the top of that album's feed. Combine with the priority feature, you can put a particular post front and center when viewing your profile.
- Albums can be a permanent means of holding posts or be deleted if desired, enabling the ability to create temporary spaces for specific posts, such as events.
- Cultivate a profile truly distinct from other users.
- Customise your albums with a name and cover photo!
How to create an album
If you haven't created an album on your profile, you will see the following panel above your General feed:

Clicking this will allow you to create your first album, including a name, a cover photo and the option to set it as your default feed when you, followers and visitors view your profile.
You can create up to four albums
Muting a user's Album
We have provided a means for muting/silencing another user's album, including their General feed. This function provides the benefit of only being shown a particular kind of content in your latest feed.
For example, let's say I enjoy posting pictures of dogs as well as posting about scientology, both of which I segment into separate albums. Some users may not want to see my posts about scientology, but they do enjoy my dog pictures, so they have the freedom to mute the album holding scientology posts, to cultivate a feed more geared to their preferences, while still being subscribed to my content.
Muting all albums and the General feed on another user's profile will essentially mute them entirely until either an album or the General feed is unmuted. This is useful if you want to take a break from another user's content without unfollowing them.
Handling your album
You can change an album's name, cover photo and priority as the default feed any time. You can also delete an album at your leisure. Deleting an album will not delete the posts held inside it - these can still be seen via your General feed.
Posts cannot be added to multiple albums.
Account Management and Other Users
How to change your username
- Open the site menu using the three-bars / 'hamburger' button top-right of the page.
- Select 'Edit Profile' from the navigation list.
- Under the heading 'Username', enter a new username.
- Finish by clicking 'Update' at the bottom of the page.
- Open the site menu using the three-bars / 'hamburger' button top-right of the page.
- Select 'Edit Profile' from the navigation list.
- Under the heading 'Username', enter a new username.
- Finish by clicking 'Update' at the bottom of the page.
How to change your password
- Open the site menu using the three-bars / 'hamburger' button top-right of the page.
- Select 'Manage Settings' from the navigation list.
- Under the heading 'Password', enter a new password.
- Finish by clicking 'Update' at the bottom of the page.
- Open the site menu using the three-bars / 'hamburger' button top-right of the page.
- Select 'Manage Settings' from the navigation list.
- Under the heading 'Password', enter a new password.
- Finish by clicking 'Update' at the bottom of the page.
How to report a post for harmful or inappropriate content
- Locate one of the user's posts.
- Expand the 3-dotted side menu located in the top-right of the post.
- Select 'Report post'.
- Proceed with the content report pop-up window to report the post.
- Locate one of the user's posts.
- Expand the 3-dotted side menu located in the top-right of the post.
- Select 'Report post'.
- Proceed with the content report pop-up window to report the post.
How to block a user
There are two ways to block another user.
The first method is:
- Go to the user's profile.
- Expand the 3-dotted side menu located alongside their username inside the top white panel.
- Select 'Block [username]'.
- Finish by clicking 'Block' in the pop-up window.
The second method is:
- Locate one of the user's posts.
- Expand the 3-dotted side menu located in the top-right of the post.
- Select 'Block [username]'.
- Finish by clicking 'Block' in the pop-up window.
A list of users you have blocked can be found by navigating to your 'Manage Settings' page in the site menu.